Today we finish up major assembly, and calibrate focus.
Strap Lugs
Here's all the pieces for the strap lugs.

And completed, from the top and side. A regular 3/8" strap will loop right through the lugs. It's best to use a very strong wood glue here. In my experience, Elmer's Wood Glue Max and Titebond III work well.
Last of all we glue them to the sides of the body. There is no hard set location, you can choose to move them to balance the camera on a strap (or not use them at all). There are two options for securing the strap lugs to the body: 1) Glue, and 1/4" wood screws for cosmetics, 2) Glue, then drill through with a 1/16" bit, and use 1/2" wood screws for better holding power.
Roll Film Adapter
There are four layers to the adapter: a 1/8" "U" shape, 1/32" "U" shape, 1/4" square with routing, and 1/4" square with magnet holes (not shown). We start by gluing these three together.
Here's the 1/4" square, with magnets inserted and glued. At this point we do NOT glue this piece to the other three layers - we wait till after calibration to do this.
These are the slide locks that hold Graflex-type backs to the adapter. All you need to do here is glue the pieces together.
Viewfinder Assembly
We'll start with the front-surface mirror. It has a blue protective covering, which we'll leave on for now.
It gets glued onto the mirror plane, using wood glue.
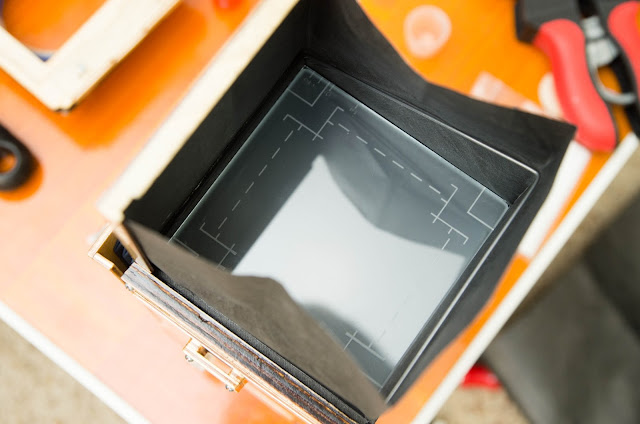
The 97mm x 97mm ground glass gets dropped in. It's a snug fit.
The acrylic cover sheet gets laid over that. It protrudes about 1mm above the wood surface. A bead of white glue is laid around this protrusion, to secure the cover sheet and ground glass.
This is something new - a black Tyvek viewfinder hood. Previously, regular black paper was used, which was prone to damage by tearing, moisture, and pinholes due to repeated folding. For those not familiar with Tyvek, it's made of flash-spun HDPE fibers formed into a sheet. Since it's made of plastic, it's waterproof, difficult to tear, and very light. That last fact isn't necessarily beneficial in this application, since it's about 5 mil thick - half the thickness of regular printer paper! It feels quite insubstantial but it should prove to be very durable.
A small steel wire (0.047") is used to support the viewfinder while it's open. The unshaped wire is supplied, and it can be bent to given dimensions using pliers. It gets secured to a small strip of wood, shown above (and painted black).
It gets glued inside the viewfinder hood.
When the viewfinder is closed, it also acts as a handle to open the viewfinder with..
Focus Calibration (Polaroid Back)
It is imperative that the focus is calibrated in the viewfinder and on the film plane. To do so, we attach both lenses to the front standard, and remove the protective covering on the mirror.
Lock the taking lens open by setting it to "B" and taping the focus lever.
We also need a Polaroid back attached to the camera, with an empty film pack inside. To judge the focus at the film plane, insert a piece of ground glass. Don't have a ground glass handy? They're simple to make yourself with a small piece of glass or hard plastic and fine sandpaper.
We compare the images in the viewfinder and at the film plane. Here's the algorithm I use for calibration:
1. Focus on an object so that the image at the film plane is in sharp focus.
2. Check the viewfinder. Is the image:
a) In focus?
b) Back focused (focused behind the object)?
c) Front focused (focused in front of the object)?
If (a), you're done! First try, too.
If (b), you need to add a spacer behind the viewing lens.
If (c), you need to add a spacer behind the taking lens.
And repeat until both images are in sharp focus.
In my case, I needed to add a 0.090" spacer behind the viewing lens. I just used a sliver of paper about 0.090" wide and wrapped it around the threads.
If you are not using a Polaroid back, and only a Roll Film back, this procedure is also applicable. However, if you are planning on using a Polaroid back AND a Roll Film back, you will want to calibrate using the Polaroid back FIRST. It's much easier to add or remove material from the Roll Film adapter to calibrate focus - the Polaroid back adapter doesn't have this luxury. In short:
If you are:
a) Using a Polaroid back only, follow this calibration procedure
b) Using a Roll Film back, follow this calibration procedure
c) Using a Polaroid back and a Roll Film back, follow this calibration procedure using the Polaroid back, THEN follow additional instructions for calibrating the Roll Film back.
Focus Calibration Part II: Roll Film Adapter
We follow a similar protocol to calibrate the roll film adapter (post Polaroid calibration). Here we have a Graflex 6x6 back with a ground glass taped across the film gate. Remember how we held off on final assembly of the roll film adapter (higher up on this page)? That will come in handy for calibration.
Here we have a new algorithm for calibrating the roll film adapter:
1) Focus so that the image in the viewfinder is in sharp focus.
2) Check the image at the film plane. Is the image:
a) In focus?
b) Back focused (focused behind the object)?
c) Front focused (focused in front of the object)?
If (a), you're done! Nice work.
If (b), you have to add some spacers to increase the registration distance.
If (c), you need to do some sanding to reduce the registration distance.
Once calibration is complete, we can finally glue the adapter together.


No comments:
Post a Comment